Ideally, I would sell these parts for profit and just buy a Netgate router to configure… but what’s the fun in that. I’ve always wanted to build my own, so I used some old gaming pc parts I had lying around, threw in a 4 port Intel NIC and installed pfsense. Part 2 will cover how I configure the device and use it in my home network.
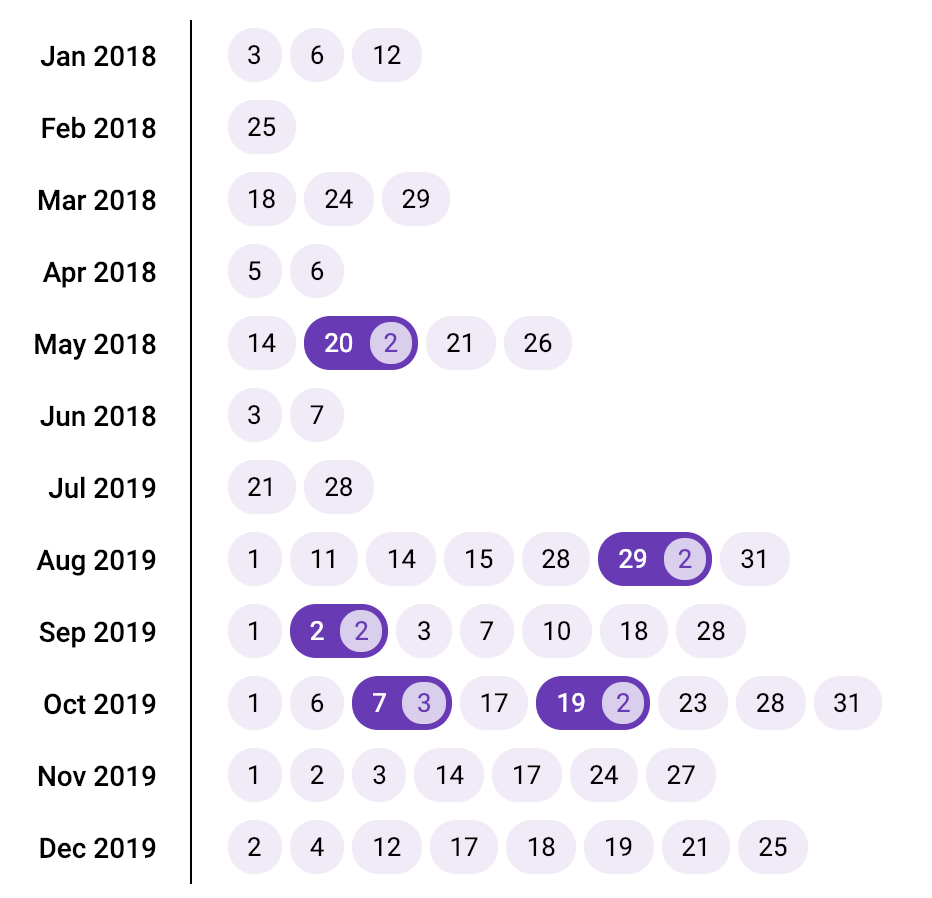
60 Books in 2018
| 1/3/2018 | The Nightingale | Kristin Hannah |
| 1/6/2018 | Little Fires Everywhere | Celeste Ng |
| 1/12/2018 | The Lost City of the Monkey God | Douglas Preston |
| 2/25/2018 | Eleanor Oliphant Is Completely Fine | Gail Honeyman |
| 3/18/2018 | Simon vs. the Homo Sapiens Agenda | Becky Albertalli |
| 3/24/2018 | Red Sparrow | Jason Matthews |
| 3/29/2018 | The Great Alone | Kristin Hannah |
| 4/5/2018 | Annihilation | Jeff VanderMeer |
| 4/6/2018 | Wonder | R.J. Palacio |
| 5/14/2018 | Bird Box | Josh Malerman |
| 5/20/2018 | Big Magic: Creative Living Beyond Fear | Elizabeth Gilbert |
| 5/20/2018 | You Are a Badass: How to Stop Doubting Your Greatness and Start Living an Awesome Life | Jen Sincero |
| 5/21/2018 | The Last Black Unicorn | Tiffany Haddish |
| 5/26/2018 | The Little Café in Copenhagen | Julie Caplin, Jules Wake |
| 6/3/2018 | Before We Were Yours | Lisa Wingate |
| 6/7/2018 | Wild | Cheryl Strayed |
| 7/21/2018 | The Outsider | Stephen King |
| 7/28/2018 | Shoe Dog | Phil Knight |
| 8/1/2018 | The Wicked Deep | Shea Ernshaw |
| 8/11/2018 | Calypso | David Sedaris |
| 8/14/2018 | Reset: My Fight for Inclusion and Lasting Change | Ellen Pao |
| 8/15/2018 | Killers of the Flower Moon | David Grann |
| 8/28/2018 | Sing, Unburied, Sing | Jesmyn Ward |
| 8/29/2018 | Early Work | Andrew Martin |
| 8/29/2018 | Girl, Wash Your Face | Rachel Hollis |
| 8/31/2018 | All Systems Red | Martha Wells |
| 9/1/2018 | Preacher, Volume 1: Gone to Texas | Garth Ennis, Steve Dillon |
| 9/2/2018 | Braving the Wilderness | Brené Brown |
| 9/2/2018 | Preludes & Nocturnes | Neil Gaiman |
| 9/3/2018 | The Talent Code | Daniel Coyle |
| 9/7/2018 | Bad Blood | John Carreyrou |
| 9/10/2018 | The Sun Does Shine | Anthony Ray Hinton |
| 9/18/2018 | Sharp Objects | Gillian Flynn |
| 9/28/2018 | Cherry | Nico Walker |
| 10/1/2018 | The Bear and the Nightingale | Katherine Arden |
| 10/6/2018 | What Alice Forgot | Liane Moriarty |
| 10/7/2018 | Between the World and Me | Ta-Nehisi Coates |
| 10/7/2018 | Imagine Wanting Only This | Kristen Radtke |
| 10/7/2018 | Everyone’s a Aliebn When Ur a Aliebn Too | Jonny Sun |
| 10/17/2018 | The Girl in the Tower | Katherine Arden |
| 10/19/2018 | Gmorning, Gnight!: Little Pep Talks for Me & You | Lin-Manuel Miranda, Jonny Sun |
| 10/19/2018 | Boundaries Where You End And I Begin | Anne Katherine |
| 10/23/2018 | Meet Me at the Museum | Anne Youngson |
| 10/28/2018 | The Husband’s Secret | Liane Moriarty |
| 10/31/2018 | Saga, Vol. 8 | Brian K. Vaughan, Fiona Staples |
| 11/1/2018 | Where the Crawdads Sing | Delia Owens |
| 11/2/2018 | Saga, Vol. 9 | Brian K. Vaughan, Fiona Staples |
| 11/3/2018 | Robin | Dave Itzkoff |
| 11/14/2018 | The Collapsing Empire | John Scalzi |
| 11/17/2018 | The Light of the World | Elizabeth Alexander |
| 11/24/2018 | As You Wish: Inconceivable Tales from the Making of The Princess Bride | Cary Elwes, Joe Layden |
| 11/27/2018 | The Consuming Fire | John Scalzi |
| 12/2/2018 | Elevation | Stephen King |
| 12/4/2018 | Man’s Search for Meaning | Viktor E. Frankl |
| 12/12/2018 | In Pieces | Sally Field |
| 12/17/2018 | Becoming | Michelle Obama |
| 12/18/2018 | Born to Run | Bruce Springsteen |
| 12/19/2018 | Educated | Tara Westover |
| 12/21/2018 | Homo Deus: A Brief History of Tomorrow | Yuval Noah Harari |
| 12/25/2018 | Circe | Madeline Miller |

Security+ Certification
Previous Experience: Very basic networking/security, SCCM engineer, Windows Administrator, 14 years of building computers
Study Time: ~2 weeks daily after work (I work full time) and weekends. Started seriously studying on 12/31. Took
Materials Used:
- Professor Messer videos on YouTube – watched the videos once through, passively but didn’t retain much info. Realized using videos for studying may not be for me unless I need additional explanation on a topic. https://www.youtube.com/playlist?list=PLG49S3nxzAnnVhoAaL4B6aMFDQ8_gdxAy
- Professor Messer Study Notes – $20 for the notes he uses in his videos. Was good for cross-referencing material a few days before the test to see details from a different source. https://www.professormesser.com/sy0-501-course-notes/
Comptia Security+ SYO-501 Study Guide on Kindle – Probably my top resource for studying. Good explanations. Good practice questions. Made flash cards of all the acronyms, ports, and key concepts from the book. So. Many. Flashcards. https://www.amazon.com/CompTIA-Security-Get-Certified-Ahead-ebook-dp-B07652KDXM/dp/B07652KDXM/ref=mt_kindle?_encoding=UTF8&me=&qid=1549133276Darril Gibson’s website for additional practice questions. I did not purchase the additional study guide, but I’ve read good things about it. I only used the free questions to get an idea of what to expect for theperformance based questions. https://gcgapremium.com/performance-based-question-demo/- The list of Security+ 501 objectives directly from Comptia’s website. I printed the list and reviewed it often starting a few days before the test to verify I knew each of the objectives and acronyms for the cert. https://certification.comptia.org/docs/default-source/exam-objectives/comptia-security-sy0-501-exam-objectives.pdf
- Udemy’s Mike Meyers Security+ 501 course – I only watched the videos on cryptography to get another angle on the topic. His videos are great and if I had time I would have watched more of them. https://www.udemy.com/comptia-security-certification-sy0-501-the-total-course
- Udemy’s Security+ Cert Practice Tests – good source of extra practice for the test. I found the questions in the
Comptia Study Guide fromDarril Gibson more like the questions on the actual test, but these tests from Udemy were still good to go through once. https://www.udemy.com/comptia-security-cert-sy0-501-practice-tests
Test Experience:
Since this was my first certification ever, I didn’t really know what to expect. I scheduled mine at a National Polytechnic Institute where they do a lot of medical training and testing of all sorts. I arrived at the testing center about 30min early (LA traffic is unpredicatable at times), and looked over my flashcards one last time. I went into the testing center about 10min early to sign in, fill out some documents and provide my 2 forms of identification (Drivers License and Passport). The receptionist then took my keys and passport (I was allowed to keep my DL, and I had left my phone in the car) and walked me into the test room. The test room is a small classroom size space with a closed door and about 30 computers. When I arrived the room was about 80% full of people sitting at the computers, typing away. I felt it was kinda odd having staggering test times, with people coming and going from the room throughout the process. The room was also very very loud from all the typing. I don’t know what type of tests they do in there, but some people were definitely writing essay’s. Thankfully, they provide earplugs. I didn’t put them in at first, but once the test started I quickly shoved them in my ears so I could think clearly. The computers themselves were definitely old and not in the greatest shape. They also provided a few pieces of laminated paper to write on and a sharpie.
As for the test, Comptia definitely loves their wordy, 5 sentence questions.. phew. Some questions I had to read multiple times just to figure out what they were asking. I did skip all of the performance based questions until the end. The first 10 multiple choice questions all seemed super tricky to me as well and halfway through the test I was convinced I was failing. After the multiple choice questions I went back to the PBQ’s (which were surprisingly easy). I reviewed other questions I was on the fence about until about 10sec left in the 90min test. After submitting it, they have you complete a quick survey on your study time, experience, gender, etc. Then they show you pass or fail and amazingly I passed. I then stared at the screen for a good 60sec in pure disbelief that I had done it. A great feeling and a great way to start 2019! Nice to see the hard work over the past 2 weeks paid off.
Passed with a score of 797/900. Not great but I’ll take it for only studying a limited amount!
I hope this helps some of you out there looking to take the Security+ certification. It’s a great one if you work in IT or just want it for the resume!
New Position: Information Security Threat Specialist
As of November 1,
A brief history. I started in this firm in January 2014 in the Charlotte office as an Application Analyst and Trainer. The role consisted of level 2 support tickets (outside the Help Center) in the local Charlotte office along with 4 others with similar roles and also training the new hires on all of the hardware and software. It was a great office and fun role that taught me a lot about corporate IT, a far cry from the world of Geek Squad and Apple Support where I worked previously. I held this role until August 2015 where I accepted a new role, Application Specialist and Developer, in the main office in Atlanta. This was more a Systems Administrator role than developer with a primary focus on building and managing the SCCM infrastructure. SCCM is a fun tool, but it can be a bit.. annoying.. at times.
When the Threat Specialist was presented to me as a possible next move, I jumped at the opportunity to interview. I’ve long been interested in Information Security, but always feared my deficiencies in the area, and it’s not exactly the easiest area to ‘jump’ into. Most employers want previous experience and it can be hard to find companies willing to train. Thankfully, my firm was willing to take the risk on me and in turn I’ve spent a lot of post-work time trying to catch up and fill in the gaps in my knowledge. I took Security+ certification on January 12th 2019, after about 2 weeks of studying, and passed. Now that I can say i have one cert, I feel a bit better about my new role in security. Next I’ve started studying for CCNA Routing and Switching which is a bit more of a daunting test. While not necessarily directly related to my role, networking is an area I have not worked in and don’t have much experience. I’m hoping studying for this cert and building a homelab will help rectify this.
While the focus of this blog has primarily been on my hobby in computer hardware and PC building, I plan to add more Security/IT related experiences and information henceforth.
How to Borrow Kindle and Audio Books from your Library for FREE!!
This guide will walk you through using your Library card to borrow eBooks and AudioBooks from your local Library!
I personally use a Kindle or the Kindle App on an iPad, but there are many other devices that can read ebooks and be used for listening to AudioBooks.
Step 1 – Get a Library card from your local library. Some let you sign up online now and send you a postcard in the mail to verify your address. Super easy!
Don’t live near a large library or is your book selection small? Having lived in a few cities, I know what this is like. A small selection can be kinda frustrating. Thankfully, a good number of the really large libraries let you become a member with a small fee even if you’re not a resident. Here’s a list of some: https://wiki.mobileread.com/wiki/EBook_Lending_Libraries
Step 2 – Sign into your libraries website. I’m a member of the LAPL, so we’ll use their site as an example.

After you click the ‘Sign In’ button, it will ask you for your Library Card # and PIN. The PIN will be provided by the Library. Do not lose either or you won’t be able to sign in!
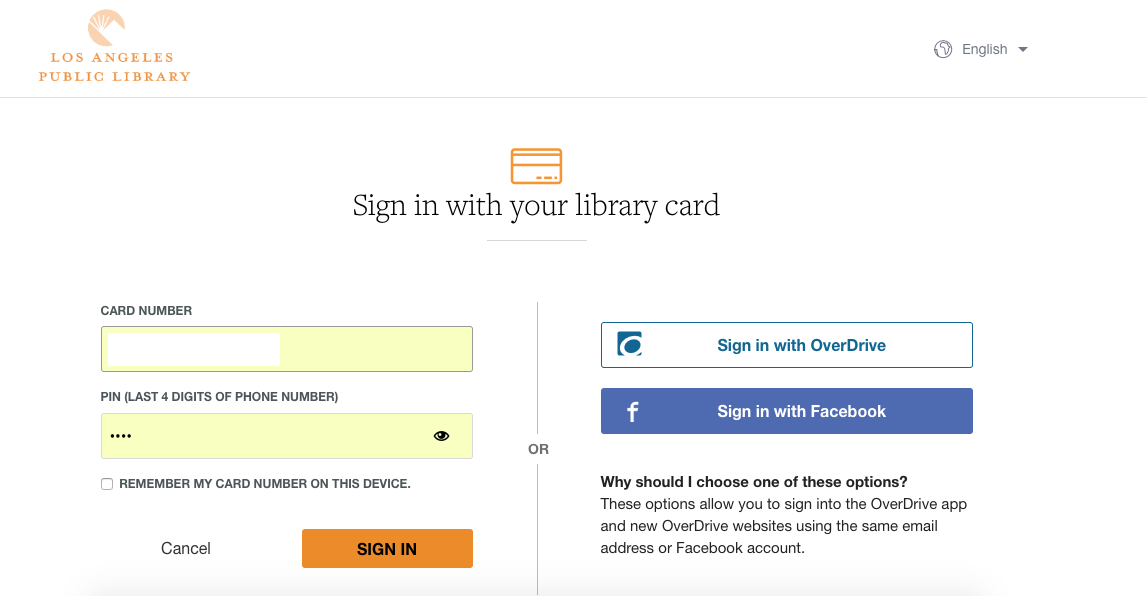
Step 3 – Once you’re signed in, don’t get overwhelmed. 😉
Every Library is setup a bit differently, so yours will not look like this, but here’s the LAPL homepage:
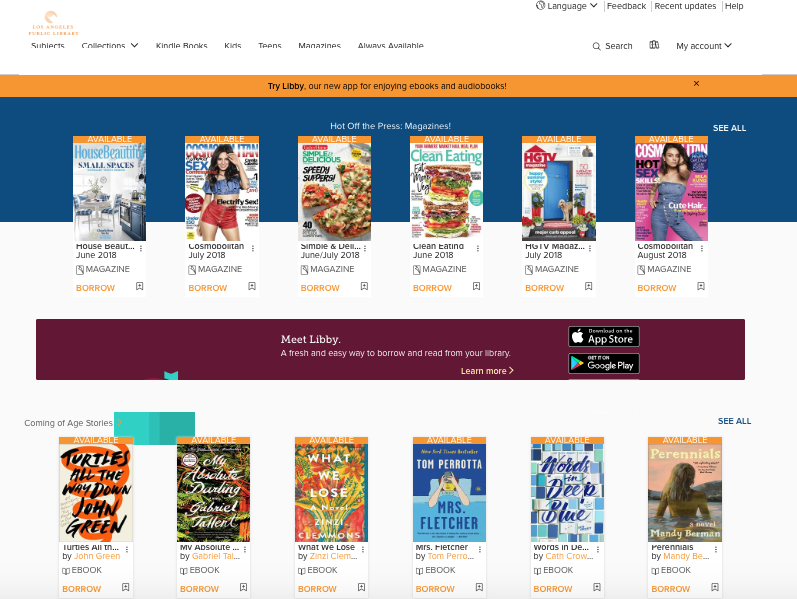
Step 4 – Find books to borrow!
You can use the search function to find specific books or select ‘Subjects’ in the top left to browse by Subjects or Formats.
Hint: On the Subjects page, I like to select ‘See all <insert crazy high number> titles’. The number will be different for every library, but this is what the LAPL offers:

Crazy right?!?! 326,718 titles for FREE for our reading pleasure. If yours doesn’t have this large of a number, don’t be discouraged. I once lived in a city where the Library ‘only’ had 30,000 titles but honestly never had an issue finding the titles I wanted. Los Angles has a VERY large population so many titles have hundreds of copies to keep up with demand.
After selecting ‘See all titles’, I change the ‘sort’ option in the top right from ‘Date Added’ to ‘Popularity (global)’. I just find this easier to sort through some of the lesser known titles.


And then select ‘Available Now’ along the left column to find a book you don’t have to wait in line for (more on this in a bit).
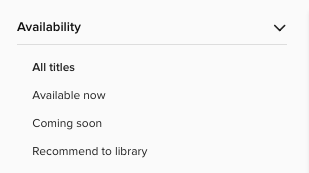
This will provide a list of the most popular books that are currently available to borrow immediately. Good way to find recent Best Sellers!
Step 5 – Borrowing a book – If you found a book that you want to borrow and is ‘Available’, select ‘Borrow’ on the listed book. These are all options that are available to borrow now.
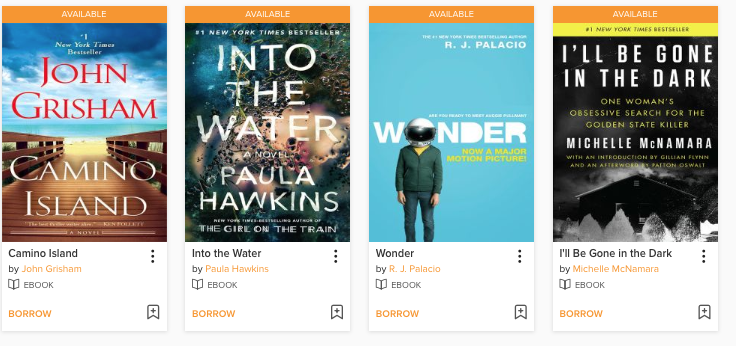
After selecting the orange ‘Borrow’ button, you may see another prompt asking you for how long you’d like to Borrow for. I usually select the longest amount of time. You can always return the book earlier if you finish it before the borrow period ends.
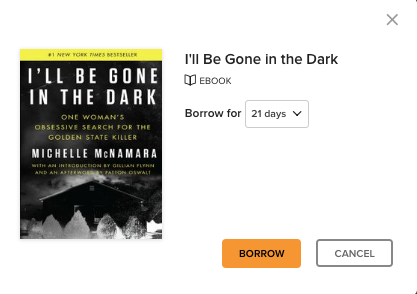
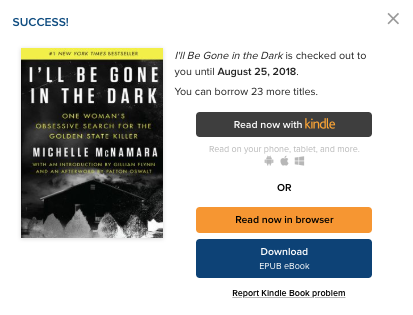
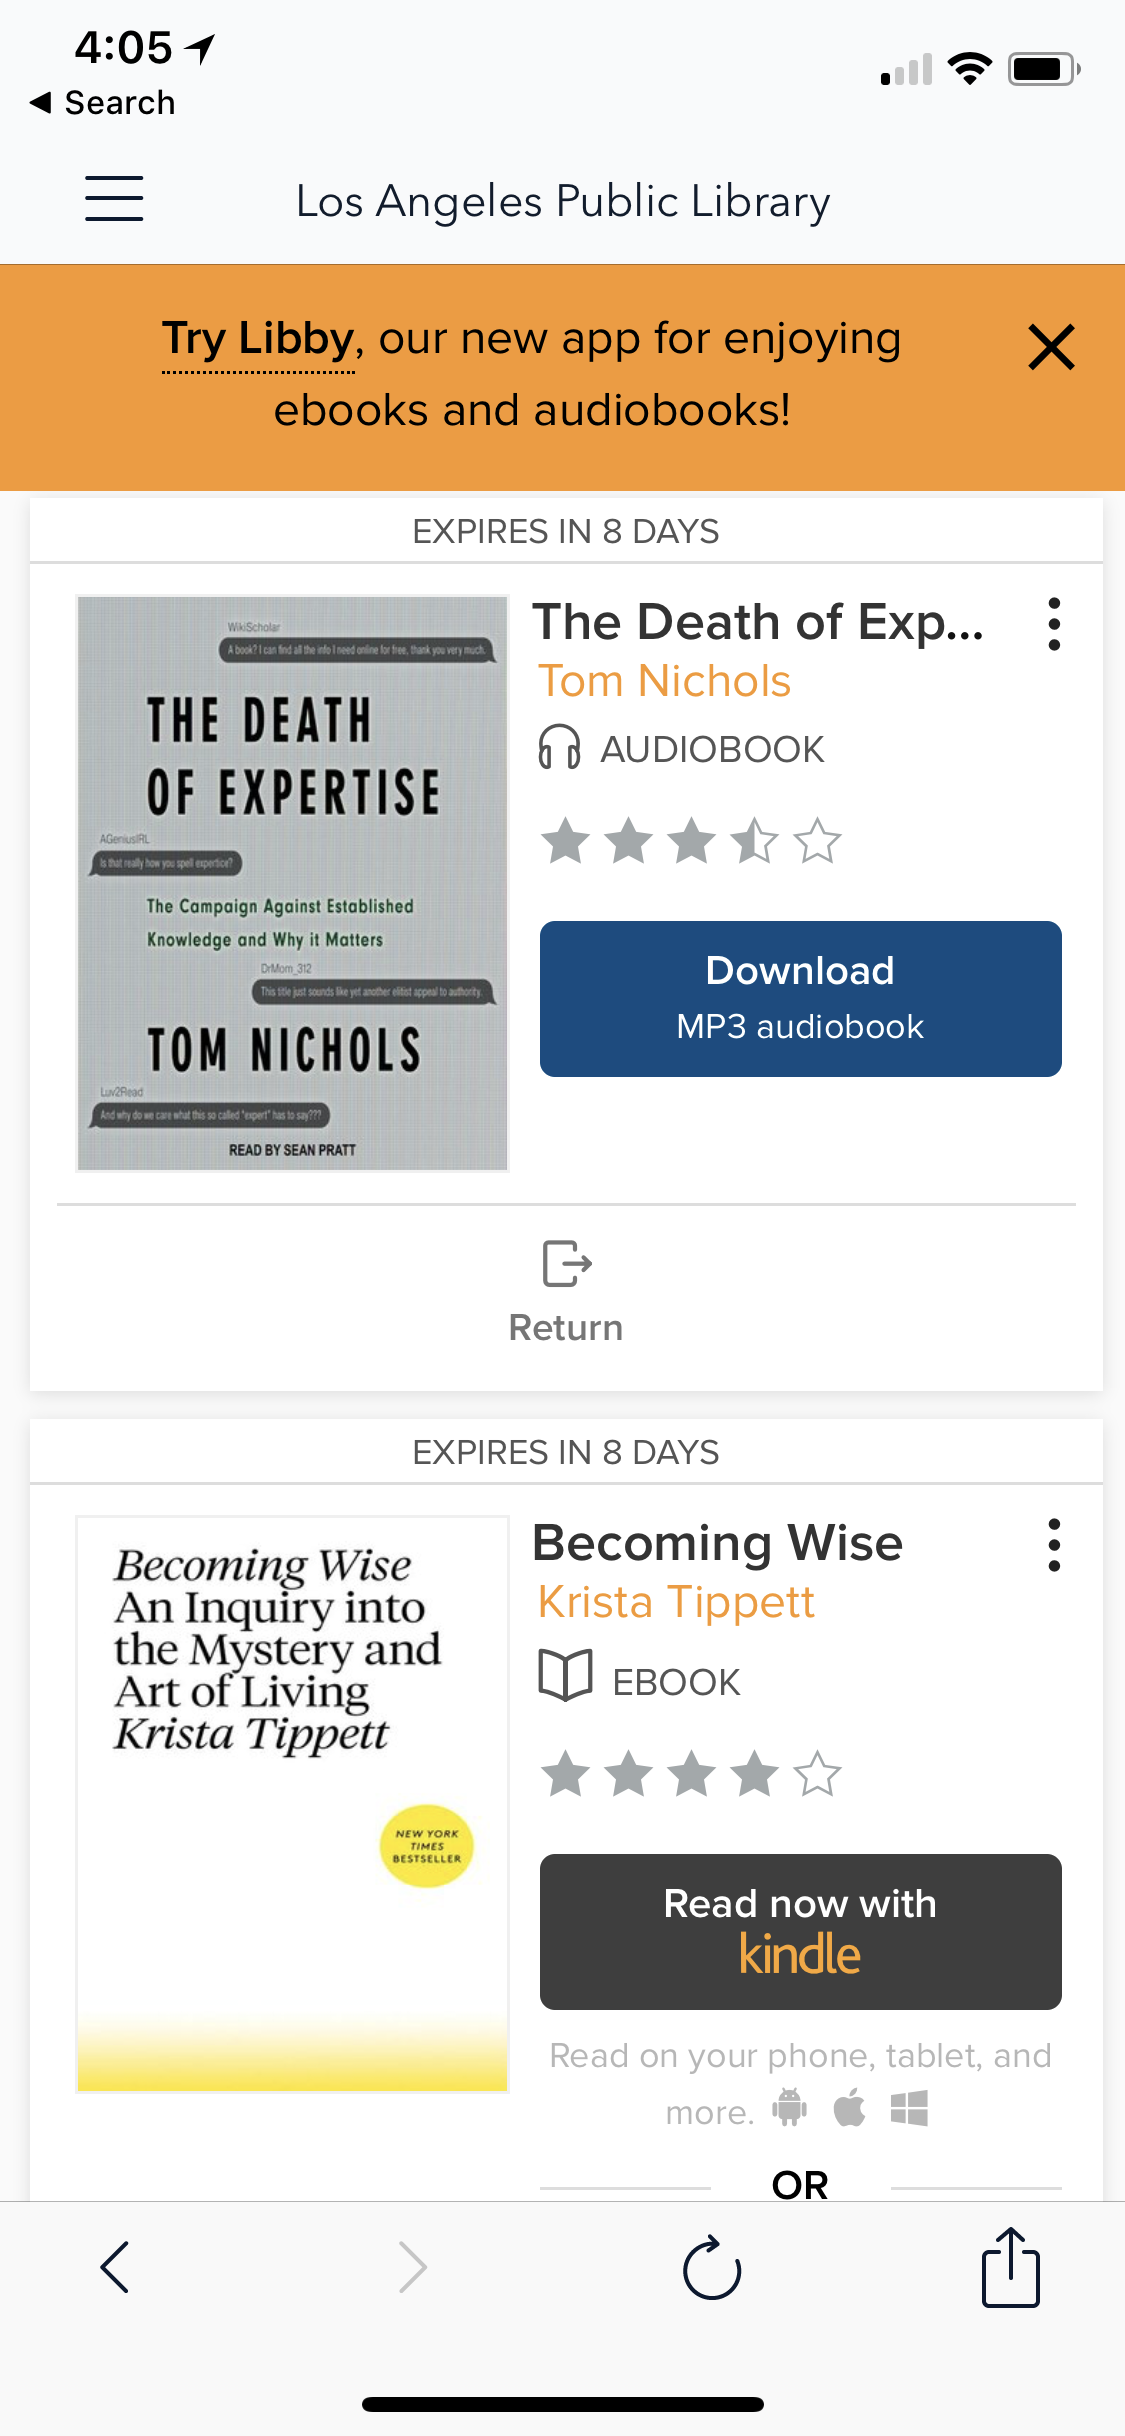
Selecting Borrow here will check out the book to you for that period of time. You will then be prompted to select how you’d like to read your newly borrowed book. I have a Kindle, so I select ‘Read now with Kindle’. Some books are not available in Kindle format and need to be read in the browser instead. I’ve only come across this a few times with novelas or essays, not really full length books.
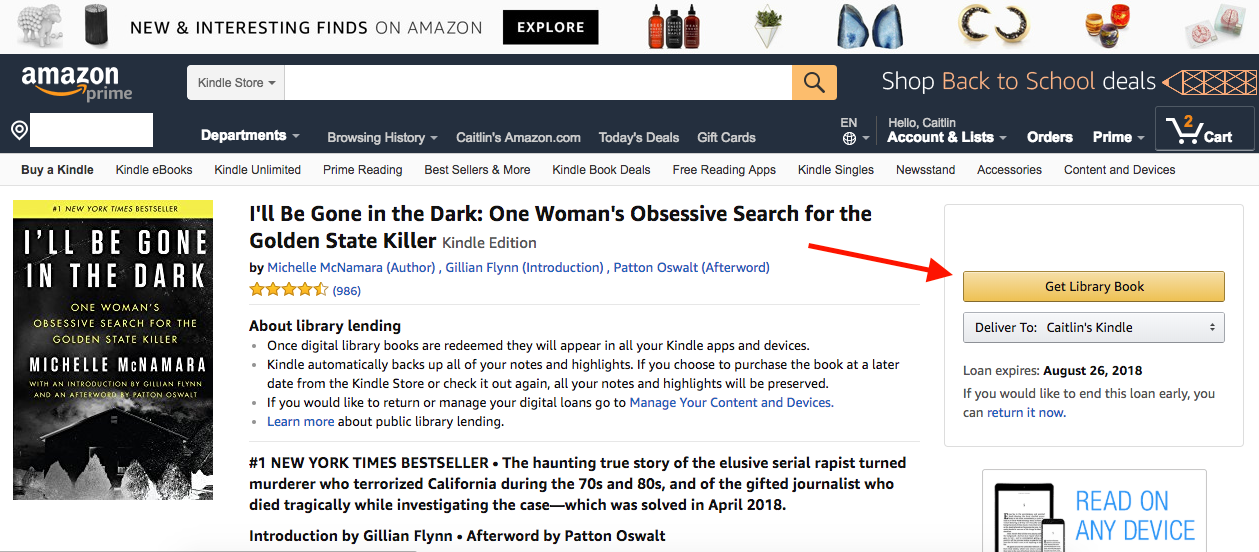
Upon selecting ‘Read now with Kindle’, you will be taken to Amazon’s website to check out the library book to yourself. Sign in if prompted.. On the books Amazon page, you will see an option for ‘Get Library Book’. Select it.
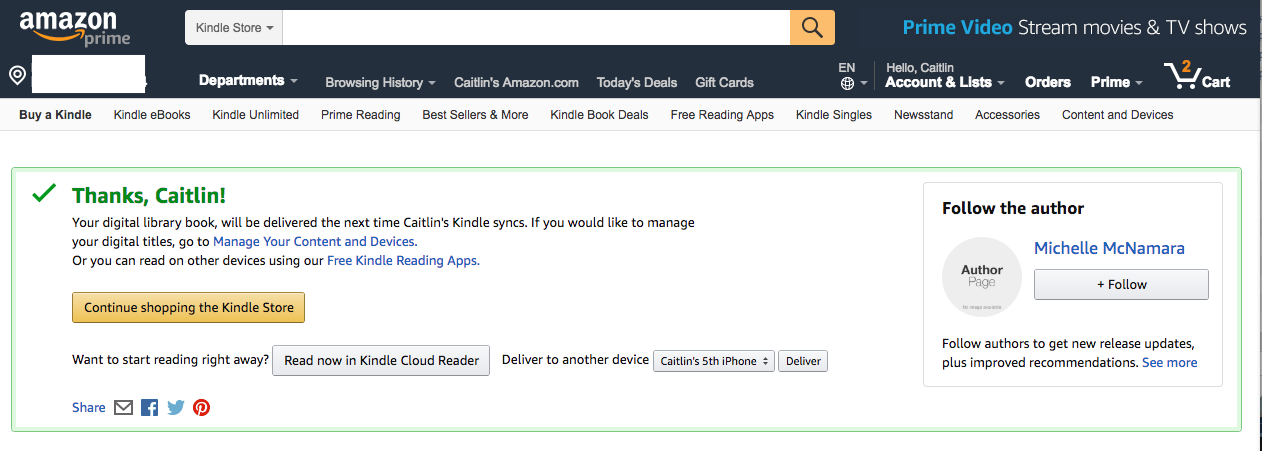
Then, FINALLY, you will see that you’ve successfully borrowed the book and you can now find it on your Kindle or other device using the Kindle App that’s connected to your Amazon Account.
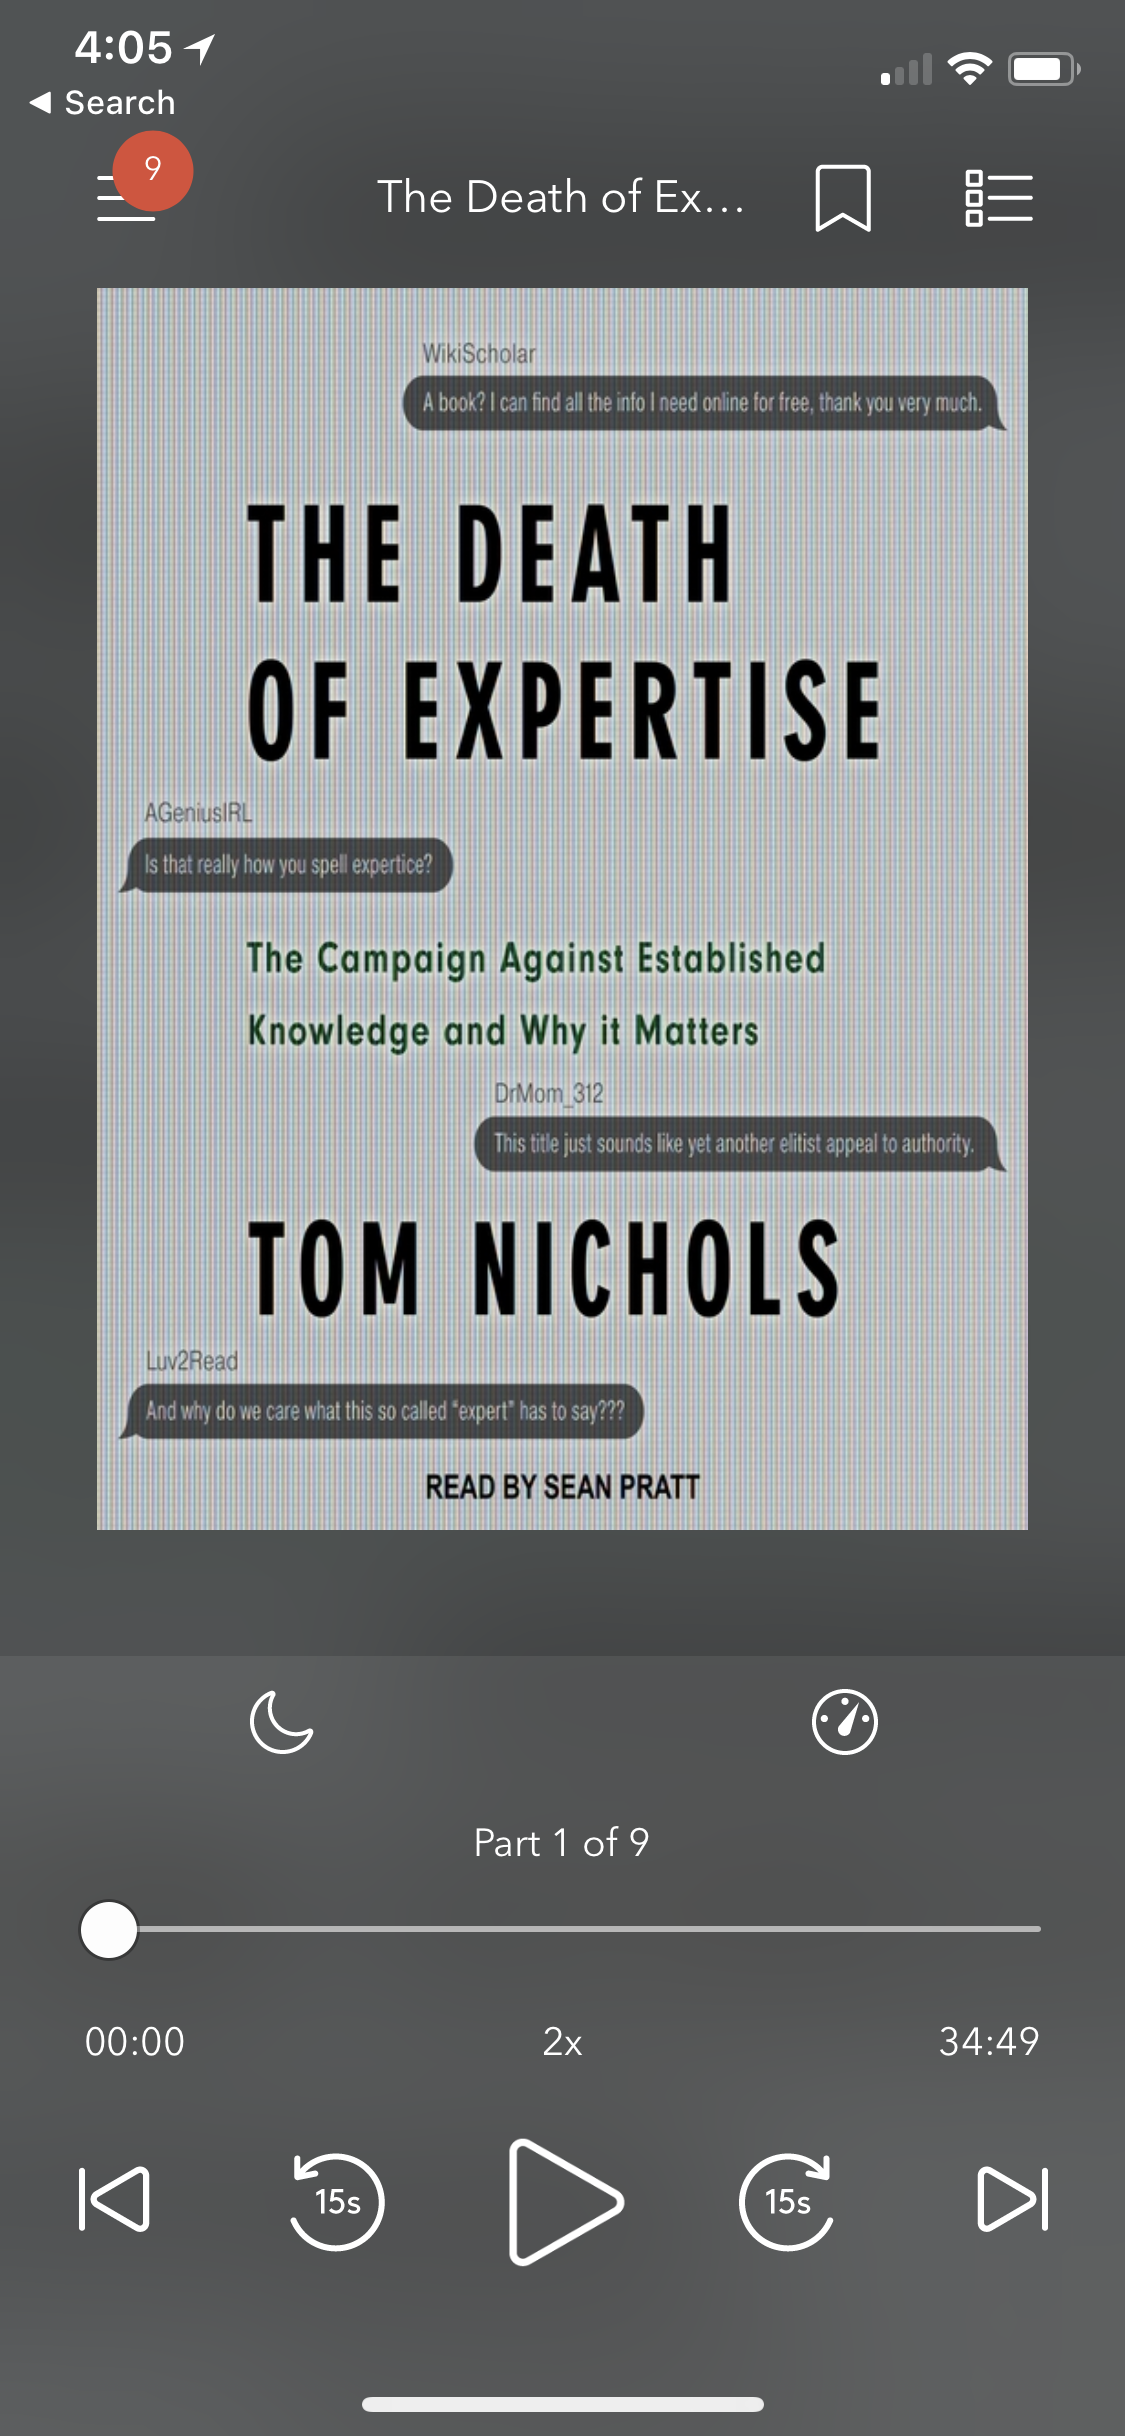
AudioBooks function the same way, however, I read them through the Overdrive (or Libby) app on my iPhone. If you don’t want to listen on your phone, you can click the ‘Download’ button on your computer instead.
Other items to mention –
Back on your Library’s page, select ‘My Account’ to see your current Loans, Holds, Wish List, History or Settings.

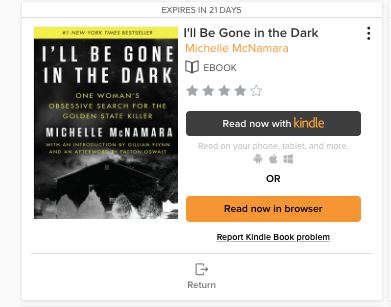
The Loans page is helpful because you can see how many days you have left on the loan, or Return the book if you finished it early (or maybe didn’t like it). Otherwise, once the Loan expires, the book will return itself and you don’t have to do a thing!
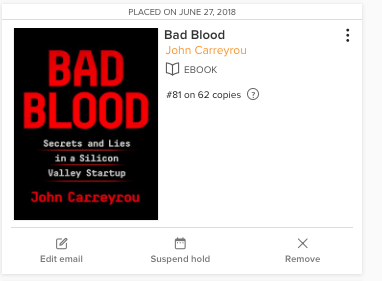
Holds – If the book you want to read is not available, you can place a ‘Hold’. This is like a wait list for the book and will be borrowed for you once your ‘Hold’ is called by the system (auto borrowing is a setting you can change if you’d rather manually check it out once your number is called, it’s in the settings). Libraries only offer a limited number of holds, so use them wisely!!
Here’s a Hold example:
Libraries are invaluable resources and now that many offer eBooks and AudioBooks with a few clicks, we can avoid the horrendous parking lots found at most libraries or the germs of a heavily borrowed hardcover. Forgone are the excuses of the past. Now is the time to READ.
Amazon STEM Club Toy Subscription – March Box
PC Building Simulator on Steam Early Access
- Newer Posts
- 1
- 2
- 3
- 4
- 5
- 6
- 7
- 8
- Older Posts